Divi Global Presets
Learn how to create Divi Presets and apply them to modules across your entire website.
Table of Contents
An Overview of Divi’s Global Presets Feature
Using Global Presets in Divi
The Global Preset Dropdown Menu
Global Preset Item Menu
Adding New Presets
Updating Existing Presets
Other Settings ( or Right-Click) Options
Conditional Logic within Global Presets
Global History States
Importing Elements with Global Presets
An Overview of Divi’s Global Presets Feature
A Powerful Replacement for Global Defaults
Global presets is a powerful evolution of global defaults, taking Divi’s global settings and styles to a whole new level. Instead of allowing one global default for an element, Global Presets allows multiple defaults called “presets” to be used for any element in Divi. For example, let’s say you have a site with three main button designs used throughout. You can give each of those three button designs their own global preset (ie. “button preset 1 “, “button preset 2”, “button preset 3”). Now every time you create a new button, you can choose from one of those global presets.
Furthermore, when you update the design of one preset, it updates every instance of that preset site-wide. Global presets speed up the design process both on a local and global scale.
The Preset Settings Dropdown Menu
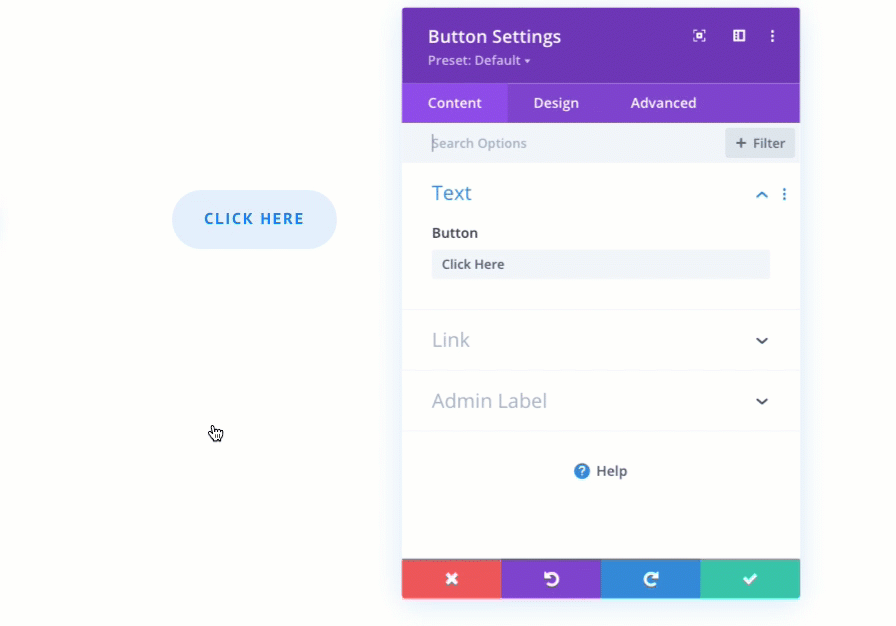
Global Presets exist within the settings modal of any Divi element. To access the global presets for a specific Divi element, open the settings and click the preset dropdown menu at the top of the modal under the heading.

Within the dropdown, you will have the option to create a new preset or update the current default preset.
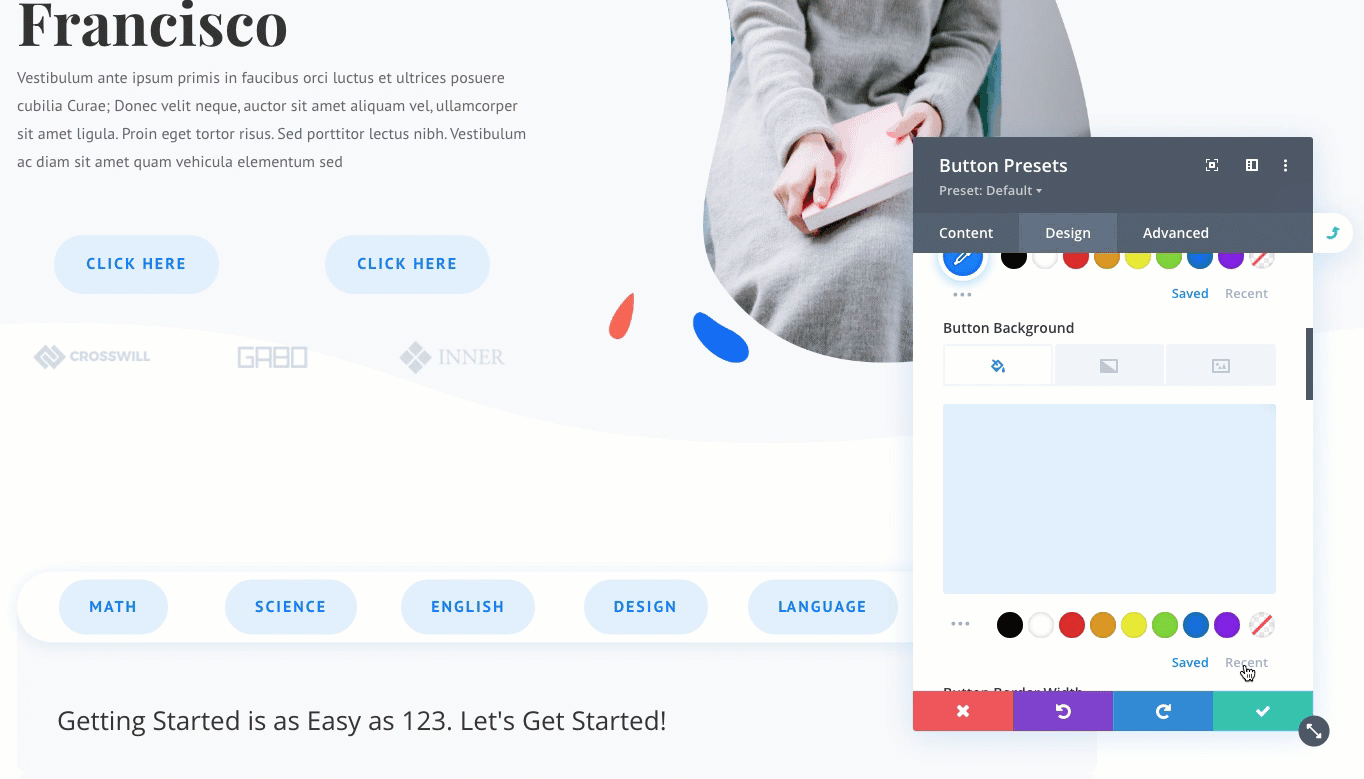
Local Side vs Global Preset Side
When updating the global presets for an element in Divi, you have the option of deploying the Global Preset Settings modal for that element. This Global Preset Setting Modal will have a gray header to make it easy to determine that you are editing global preset options, rather than options that only apply to the element locally. 
The global preset dropdown menu and options are identical in both the local settings modal and the global presets settings modal. This will make it easy to update global presets no matter what side you are currently working from.

Using Global Presets in Divi
The Global Preset Dropdown Menu
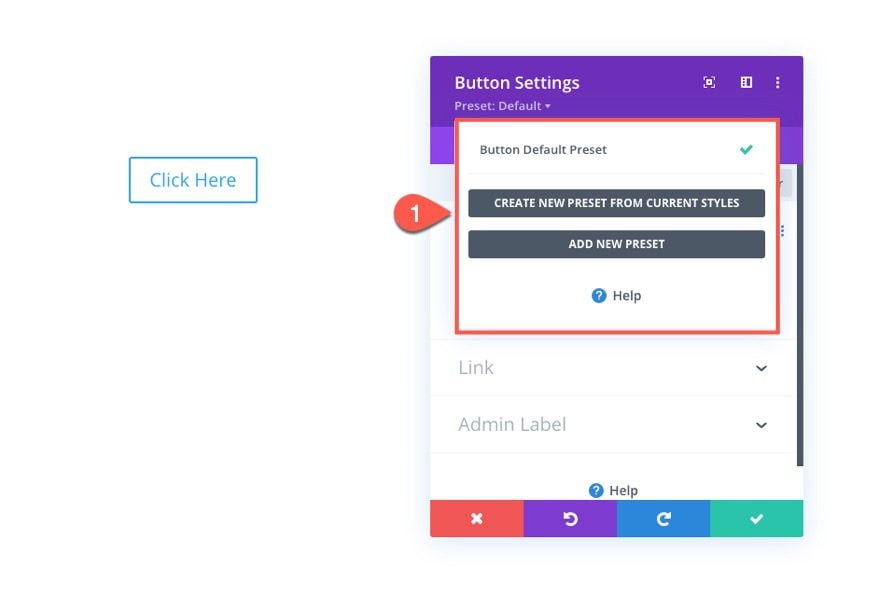
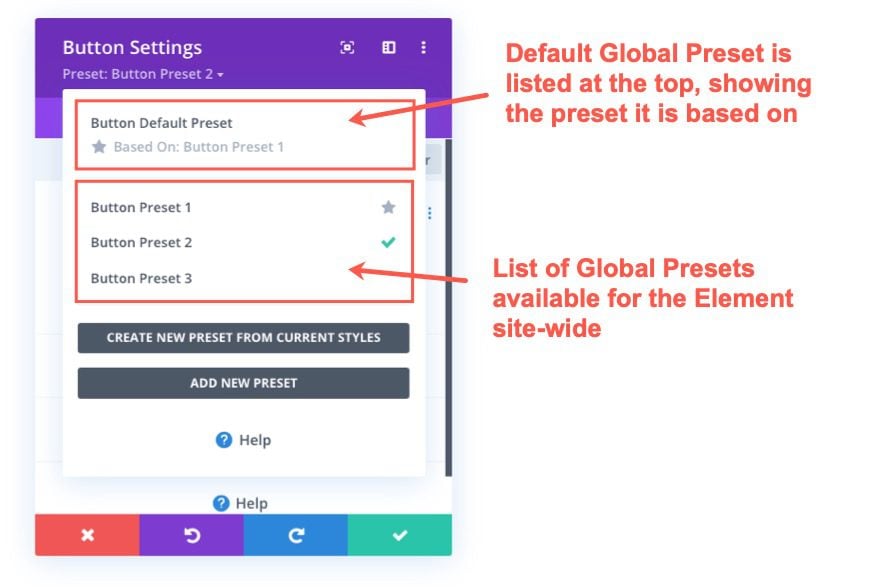
By default, the Global Preset Dropdown Menu will include only the default preset which will, of course, already be selected.
List of Presets
Once more presets are added, the dropdown menu will list the available global presets for that element. The default global preset will remain listed at the top of the dropdown along with the name of the preset it is based on.
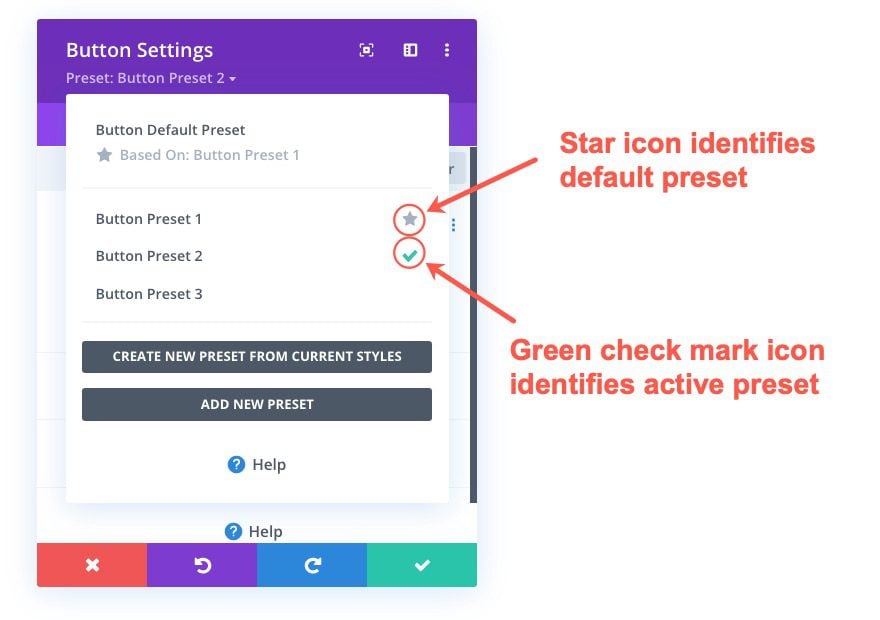
“Star” and “Checkmark” Icons
Next to certain presets in the list, you will notice a star icon and a check icon. The star icon identifies the preset that is being used as the default preset. The green checkmark icon identifies the active preset (or the preset currently being used by the element).
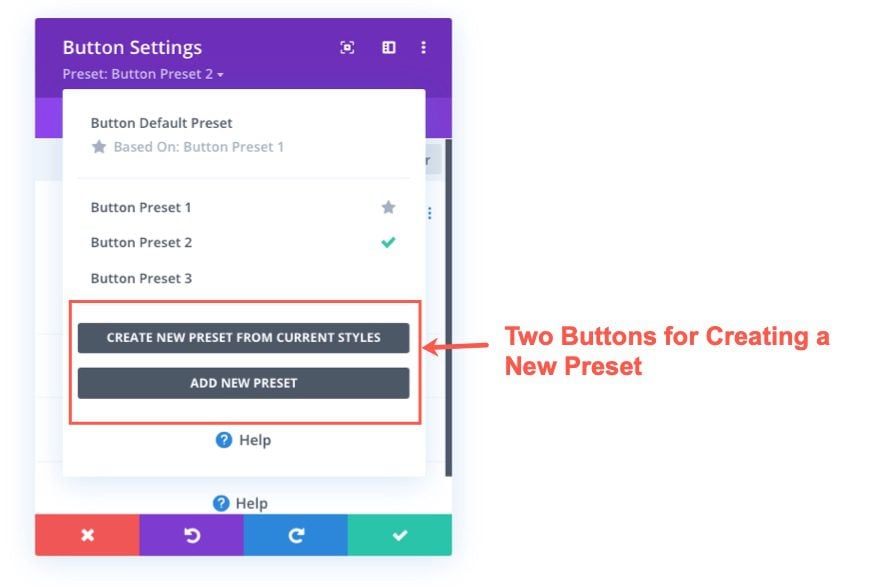
Buttons for Creating New Presets
Also included in the presets dropdown are two main buttons. Click the “Create New Preset From Current Styles” button if you want to jumpstart the preset with the designs currently active on the element. Or, click the “Add New Preset” button to add a new preset from scratch.
Global Preset Item Menu
When hovering over an individual global preset within the dropdown, the item will turn blue and a menu with additional options will appear.
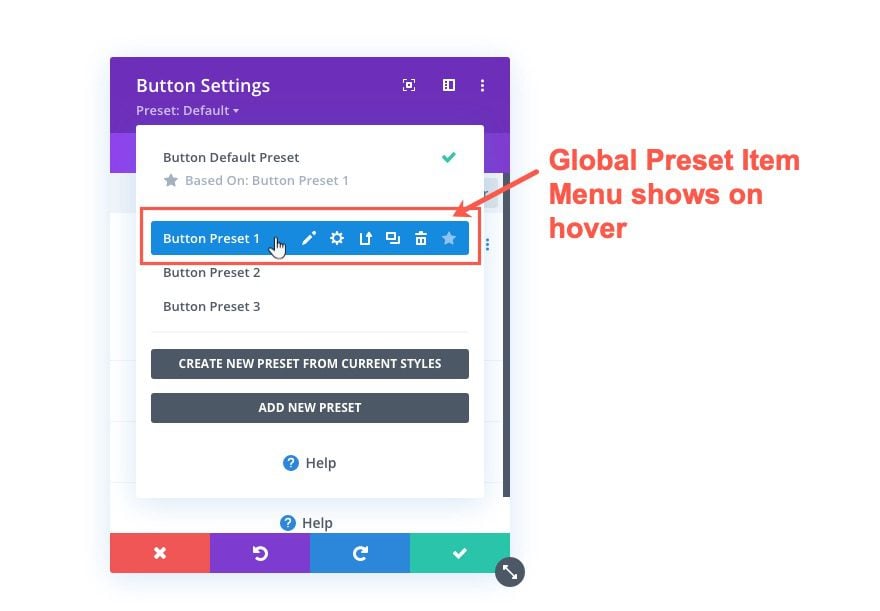
This menu item include the following options:
- Edit
- Settings
- Update Preset with current styles
- Duplicate
- Delete
- Assign as default
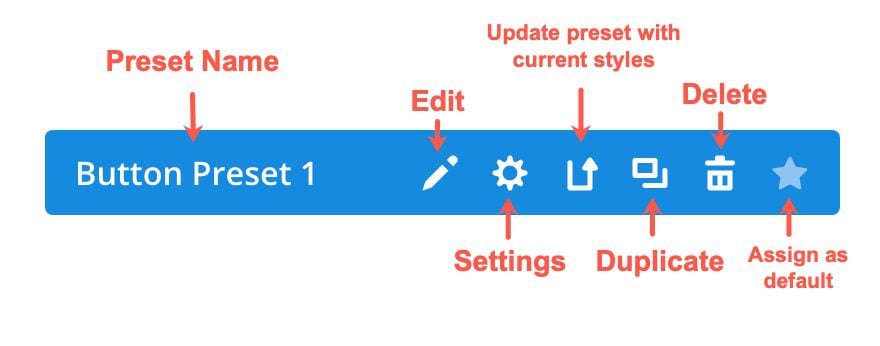
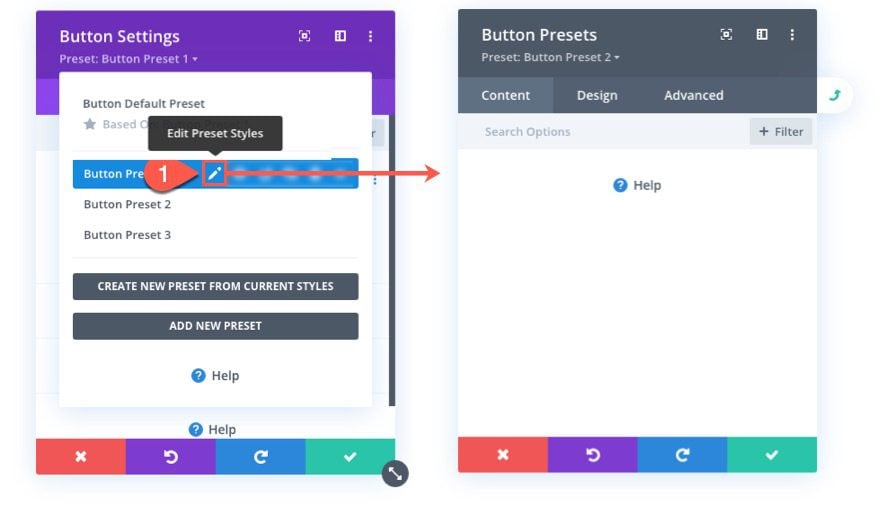
Edit Preset Styles
The Edit icon will deploy the global preset side of the element (with a nice flip animation). There you can update the design of that particular global preset.
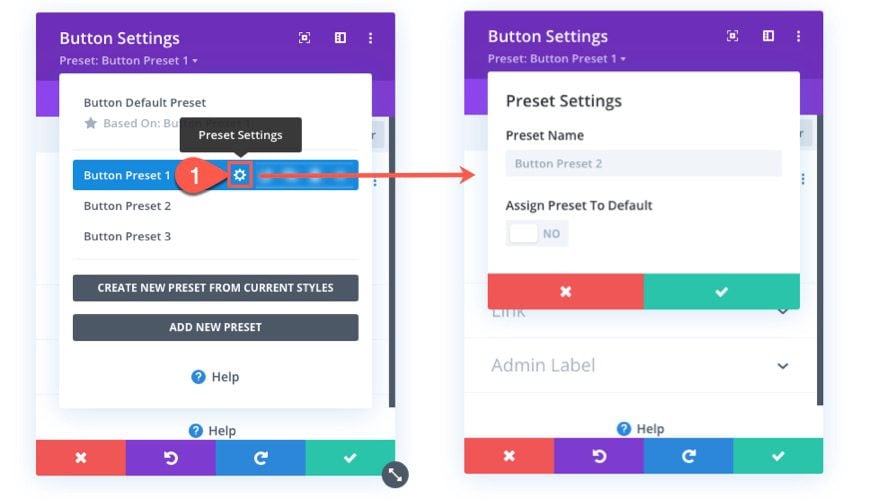
Preset Settings
The gear icon will open the Preset Settings where you can edit the name of the preset or assign the preset to default.
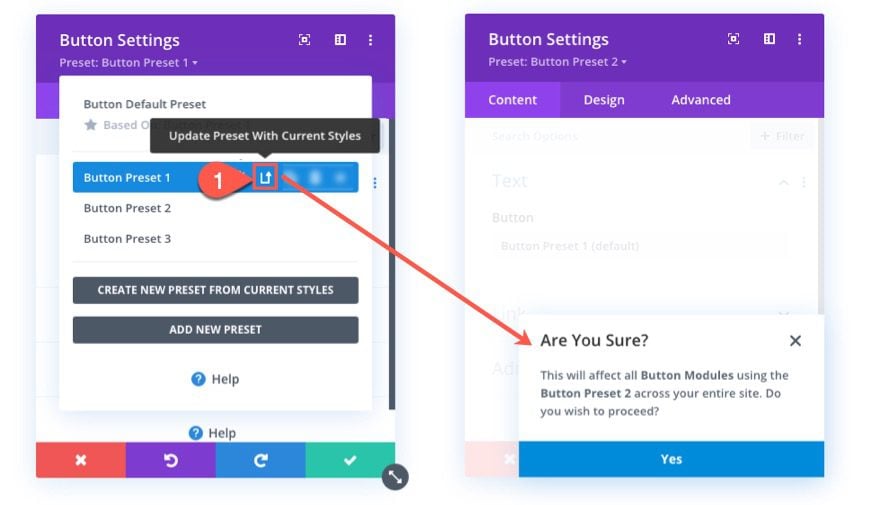
Update Preset With Current Styles
The update icon allows you to update the global preset with the current styles of the element. This is a quick way to apply the design you are working on to an existing preset. And since this will have an effect on all elements using this global preset site-wide, there is a helpful “Are You Sure?” notification that will popup before applying the update.
Duplicate Preset
The duplicate icon will clone the preset and open the preset settings of the duplicate so that you can give it a proper name or assign it as the default. This is a great option for creating a new preset without having to start the design from scratch.

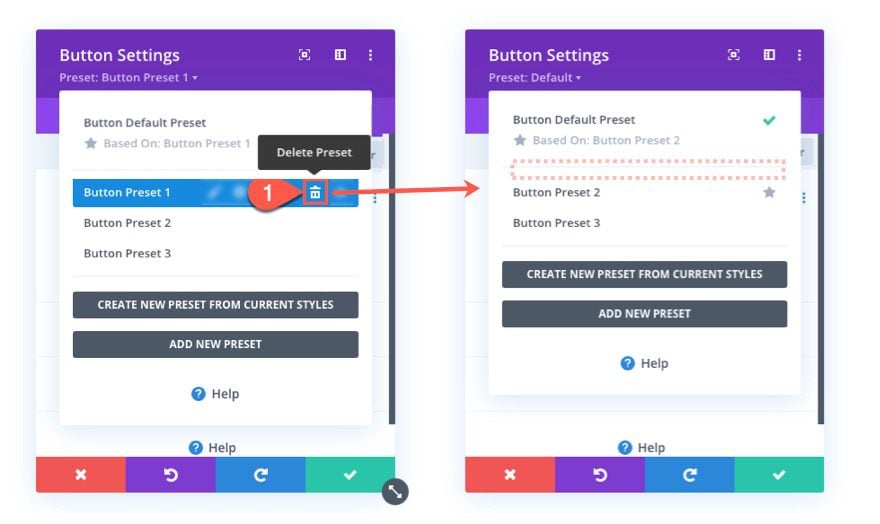
Delete Preset
The delete icon will delete the preset. The “Are You Sure?” notification will remind you that you are deleting a preset that affects the entire site. And, if the deleted preset happens to be the one used as the default, a new preset will take its place as the default preset for that element.
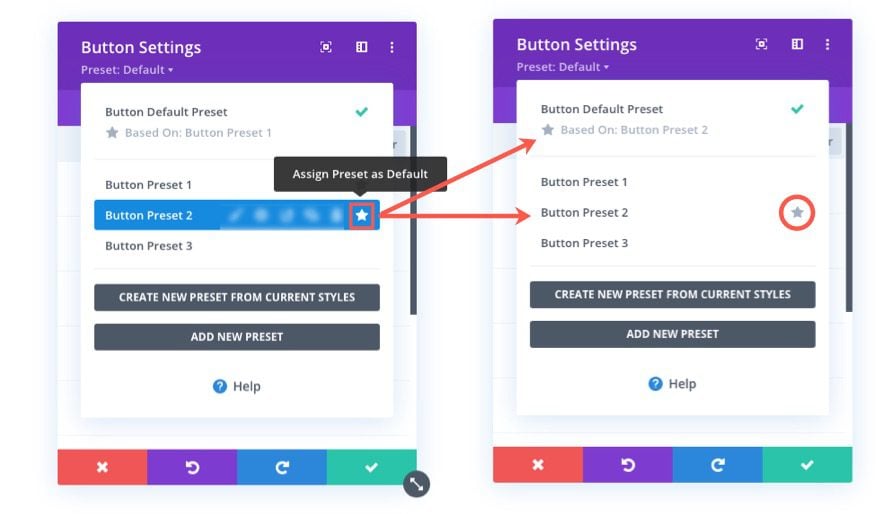
Assign Preset as Default
As mentioned earlier, the star icon indicates the default preset. Clicking on the star icon within the preset’s menu will assign that preset as the default.
Adding New Presets
Divi gives you a few options for adding a new global preset. These include creating a new preset from scratch, creating a new preset using the current styles of the element, or duplicating an existing preset.
From Scratch
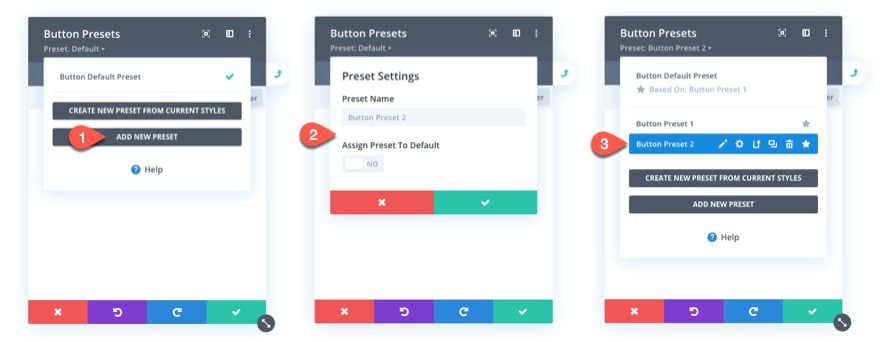
To create a new preset from scratch, select the Add New Preset button from the preset dropdown. Update the preset settings for the new preset (preset name and/or assign as default). Then use the new preset’s menu to make further changes like editing the preset’s styles or updating the preset with the current styles of the element.
From Current Style
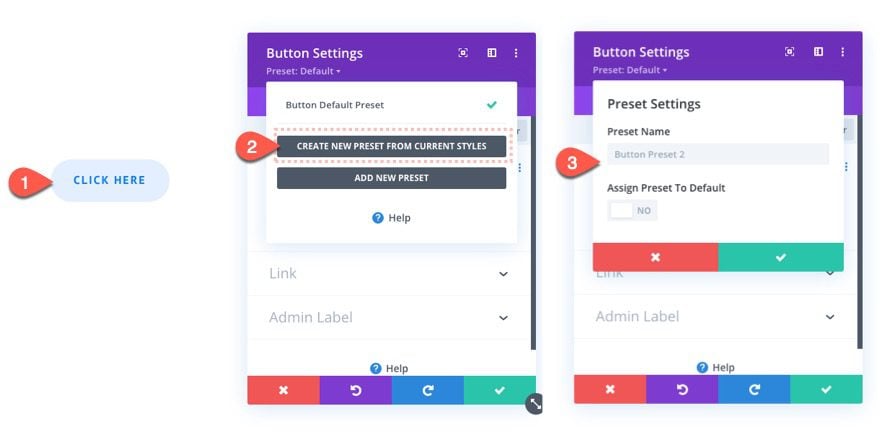
If you have an element that is already styled, you can choose to make that element a new global preset by clicking the button labeled “Create New Preset From Current Styles.” This is more convenient when working with existing designs and you want to jumpstart a new preset design.
Duplicating Another Preset
As mentioned earlier, you can use the duplicate icon to clone an existing preset which will give you a jump start on designing a new one.
Updating Existing Presets
There are multiple methods for updating the design of an existing global preset in Divi. This gives the user more power to update the design in a way that makes the most sense to them.
Editing a Preset’s Settings
The most direct way to update an existing preset is to click the edit icon on the preset’s menu. This will flip the element into its global preset modal where you can update the settings for that specific global preset.
Update Preset With Current Styles
As mentioned earlier, you can update the settings of an existing preset using the update icon. The update icon allows you to update the global preset with the current styles of the element. This a quick way to apply the design you are working on to an existing preset.
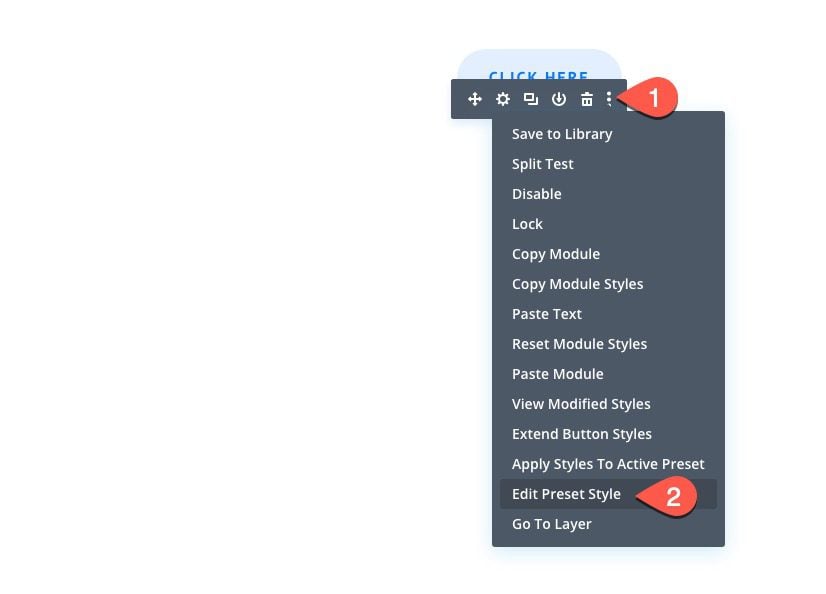
Other Settings ( or Right-Click) Options
Edit Preset Style
In addition to the global preset menu items, you can also use the “Other Settings” or “right-click” menu to edit an existing preset style. Once you open the menu, click the “Edit Preset Style” option. This will open the global preset modal settings for the preset assigned to that element (same as clicking the edit icon on the preset item menu).
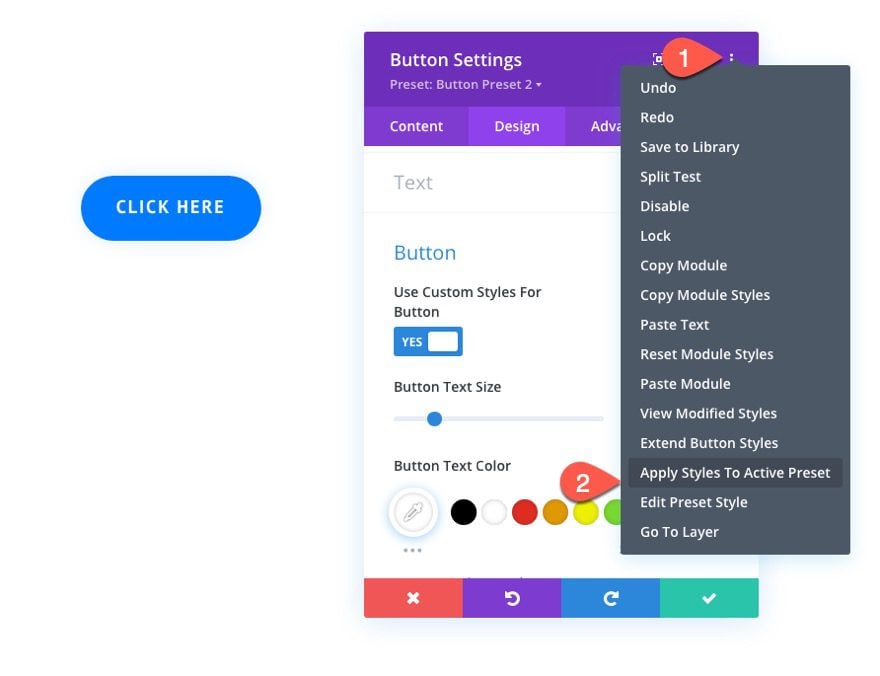
Apply Styles to Current Preset
The “Other Settings” menu also includes the option “Apply Styles to Active Preset.” This is basically the same as the “Update preset with current styles” option available in the preset item menu. However, this option may be more convenient if you don’t want to open the settings of a particular element to apply the change.
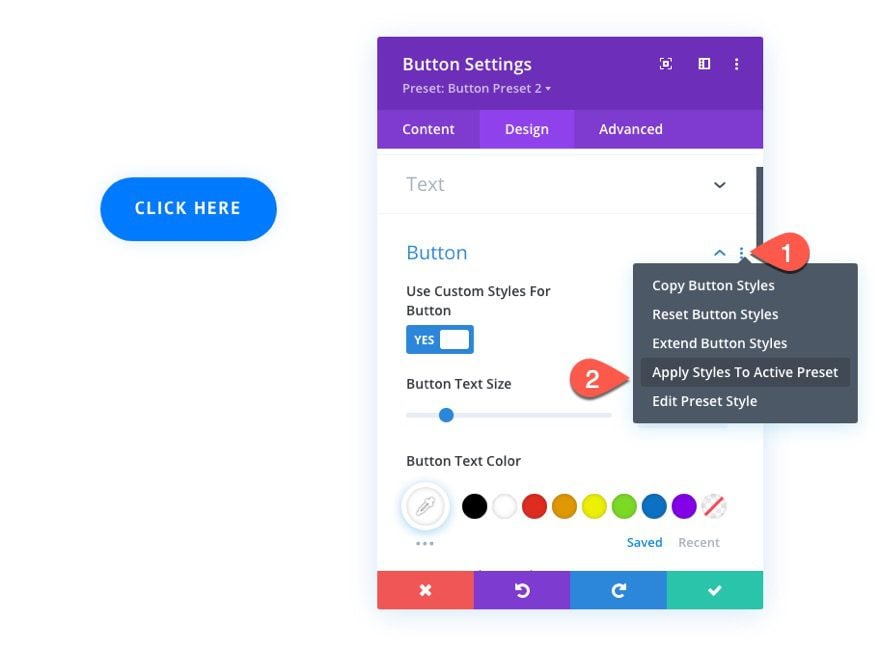
Applying Option Group to Current Preset
Use the “Other Settings” menu for an option group/toggle to apply the styles of that particular option group to the active preset.
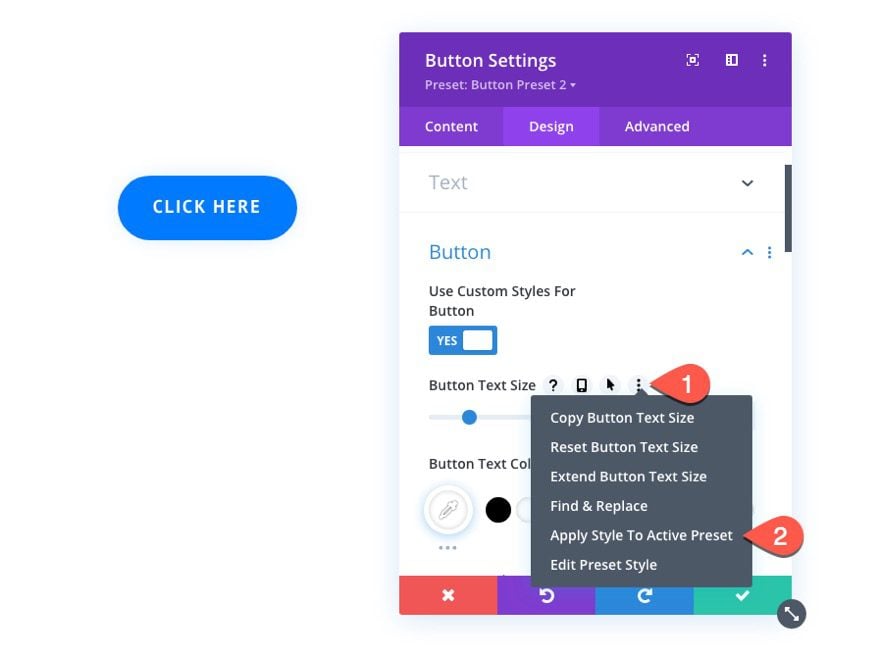
Applying Single Style Option to Current Preset
Also, you can use the “Other Settings” menu to apply a single option to the active preset. For example, you may need to adjust the text size for a particular preset. To do this, open the “Other Settings” menu next to the option, and select “Apply Style to Active Preset.”
Choosing Different Presets
Once you have multiple presets available for an element, you can easily choose a different preset for that element by clicking the preset within the list.
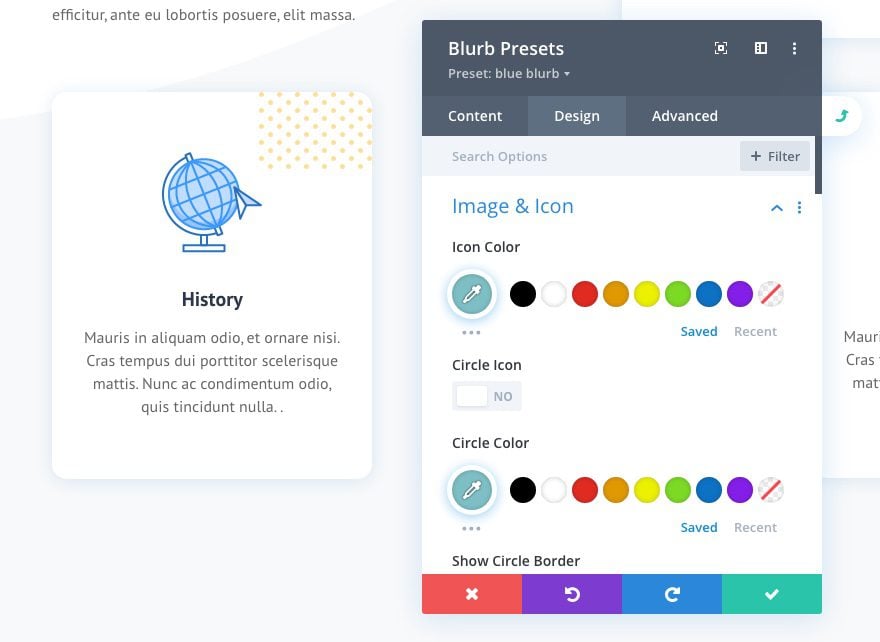
Conditional Logic within Global Presets
Normally, when updating the settings of an element, certain options are only available based on conditional logic. For example, icon styles are only available when a user selects to use an icon instead of an image for the blurb module. Having this functionality cleans things up by not including options that don’t apply to the design.
However, when editing the global presets for an element, the conditional logic (which normally hides or shows options based on the logic) is ignored. This allows users to design global presets for all options that may or may not be used when adding the element to the site.
As you can see in the illustration below, the icon styles are available for the blurb preset even though an image is being used.
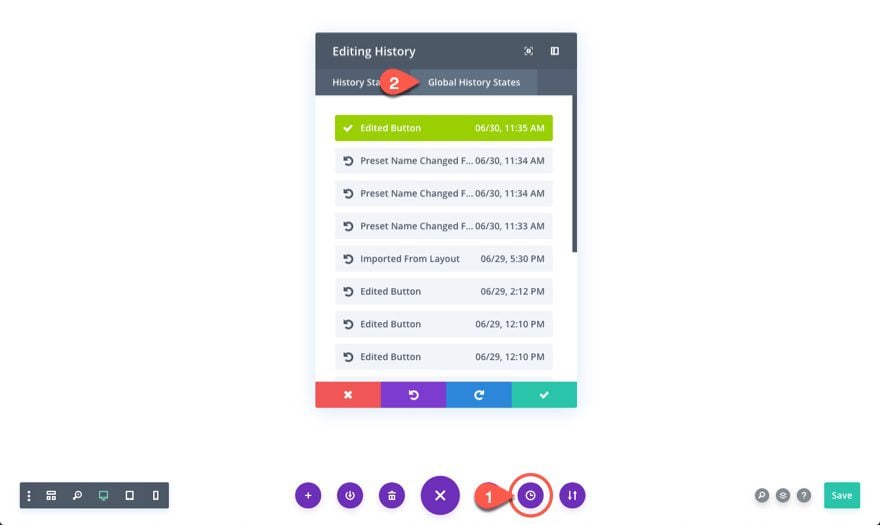
Global History States
Make a mistake with presets? Don’t worry. You can control history states for site-wide changes with Global History States. To access the editing history modal, click the clock icon in the settings menu. Then select the Global History States tab within the History modal. There you will be able to select different site-wide states to undo mistakes. A new state will be added to the list each time you save and confirm a global preset change to a module, row, or section. All you need to do is select the state from the list to revert back to previous states.
Importing Elements with Global Presets
When you import an element with global presets to the Divi library, you will have the option to include or exclude the global presets. To do this, navigate to Divi > Divi Library. Then click the Import & Export button. In the portability popup, select the import tab. Then select the file to import, select “Import Presets.” Then click the import button.
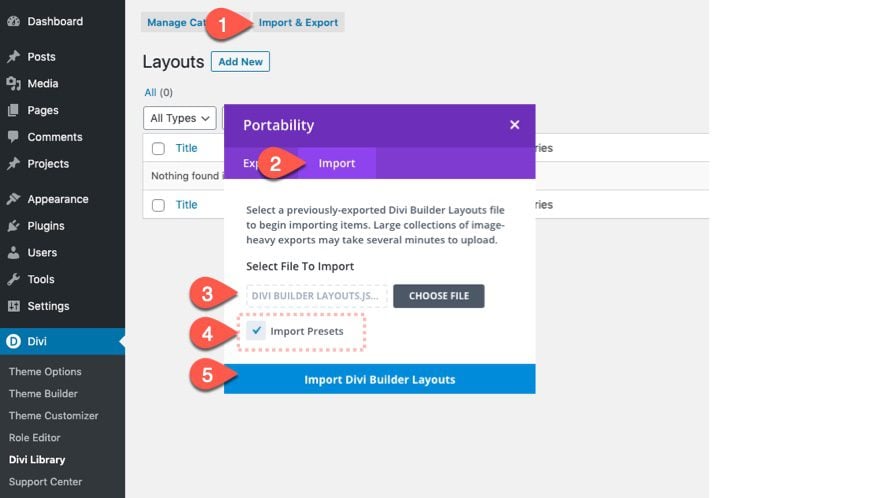
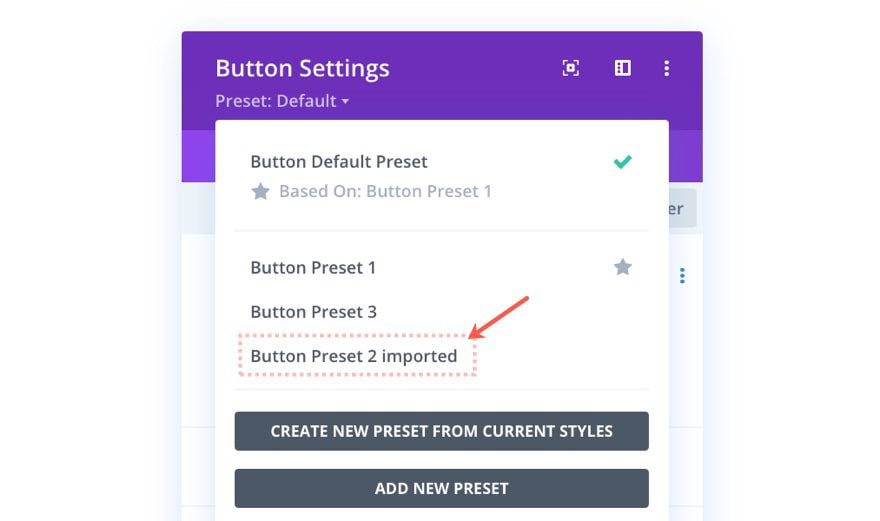
The “Imported” Suffix
When you export or import an element with global presets, the imported elements global presets will automatically be renamed with the suffix “imported.”